

Oh, the first time I tasted pickled ramps wild leeks, it was like a flavor explosion in my mouth! I’d been foraging with my uncle in the woods when we stumbled upon a whole patch of these wild onions. “These,” he said with a wink, “are nature’s candy when you pickle ’em right.” He wasn’t wrong. That perfect balance of tangy, garlicky goodness with just a hint of sweetness? Absolute magic. Now I stash jars of these vibrant pink pickles in my fridge year-round – they’re incredible on everything from eggs to burgers. Once you try them, you’ll understand why Appalachian cooks have been preserving these spring treasures for generations.

Why You’ll Love These Pickled Ramps Wild Leeks
Listen, these aren’t just any pickles – they’re little jars of springtime magic! Here’s why they’ve become my kitchen staple:
- That addictive tang: The vinegar brine gives them the perfect punchy kick that makes your taste buds sing.
- Effortless to make: Seriously, if you can boil water, you can make these. The hardest part is waiting the week before eating!
- Lasts forever (almost): Properly sealed, they’ll keep in your fridge for months – if they last that long.
- Goes with everything: I toss them in salads, pile them on sandwiches, even chop them into dressings. My cousin swears by them on pizza!
Ingredients for Pickled Ramps Wild Leeks
Okay, let’s gather our goodies! These are the simple ingredients that transform wild leeks into those addictive pickles you can’t stop eating. I always use fresh ramps in spring when they’re at their peak – trust me, it makes all the difference. Here’s exactly what you’ll need:
- 1 pound ramps (wild leeks) – cleaned thoroughly (dirt loves hiding in those folds!) and trimmed, with roots removed
- 1 cup white vinegar – the plain distilled kind works perfectly here
- 1 cup water – filtered if your tap water has strong flavors
- 1 tablespoon kosher salt – I prefer Diamond Crystal; if using table salt, reduce to 2 teaspoons
- 1 tablespoon sugar – just enough to balance without making them sweet
- 1 teaspoon black peppercorns – whole, not ground
- 1 teaspoon mustard seeds – the yellow ones add the perfect subtle zing
- 1 bay leaf – it’s amazing how much flavor one leaf adds
That’s it! No fancy ingredients – just good, simple stuff that lets the ramps shine. And don’t worry if you’re missing something; we’ll talk variations later!
Equipment You’ll Need
Don’t worry – you probably already have everything! Here’s what you’ll grab:
- Mason jars (pint-sized work best)
- Saucepan (medium-sized for the brine)
- Tongs (for handling hot jars)
Pro tip: Those jars must be sterilized – I just boil them for 10 minutes. Easy peasy!
How to Make Pickled Ramps Wild Leeks
Alright, let’s get pickling! This is where the magic happens, and I promise it’s easier than you think. Follow these steps, and you’ll have jars of tangy goodness ready in no time. The key is taking your time with each step – especially that all-important sterilization!
Sterilizing the Jars
First things first – we need squeaky-clean jars. I learned this the hard way when a batch went bad because I rushed this step! Here’s how I do it:
- Fill your largest pot with enough water to completely submerge the jars and lids
- Bring to a rolling boil and carefully lower in your jars and lids (I use tongs for this)
- Boil for a full 10 minutes – set a timer!
- Remove with tongs and let air dry upside down on a clean towel
Important: Don’t wipe the jars after sterilizing – that can reintroduce bacteria. Just let them cool until they’re warm to the touch before filling.
Preparing the Brine
While the jars are cooling, let’s make that flavorful brine that makes these pickles so addictive:
- Combine vinegar, water, salt, sugar, peppercorns, mustard seeds, and bay leaf in your saucepan
- Bring to a boil over medium-high heat, stirring occasionally to dissolve the salt and sugar
- Once boiling, reduce heat and let it simmer gently for 5 minutes – this lets the spices infuse the liquid
- Remove from heat when done – that peppery, vinegary aroma means it’s ready!
Pro tip: Taste your brine (carefully – it’s hot!). Want more kick? Add extra peppercorns. Sweeter? A bit more sugar. Make it yours!
Packing and Sealing
Now for the fun part – packing those beautiful ramps into their cozy vinegar bath:
- Stand the ramps vertically in your sterilized jars, packing them in tightly but not smashing them
- Slowly pour the hot brine over the ramps, leaving about 1/2 inch of space at the top (called headspace)
- Use a chopstick to remove any air bubbles by gently pressing along the sides
- Wipe the jar rims clean with a damp paper towel (any residue can prevent sealing)
- Seal tightly with the sterilized lids and bands – but don’t overtighten!
Let the jars cool to room temperature before refrigerating. The hardest part? Waiting a week before digging in – but trust me, it’s worth it!
Tips for Perfect Pickled Ramps Wild Leeks
After making dozens of batches (and eating even more), I’ve picked up some tricks that’ll take your pickled ramps from good to “can’t-stop-eating-them” amazing. Here’s what I’ve learned:
- Freshness matters: Use ramps within a day or two of picking or buying. Wilted ones lose that crisp texture we love.
- Clean thoroughly: Those pretty pink stems hide dirt like nobody’s business! Soak them in cold water and swish around before trimming.
- Adjust to taste: My uncle adds a garlic clove to each jar – genius! Try red pepper flakes for heat or coriander seeds for citrusy notes.
- Patience pays off: I know it’s hard, but wait at least 5 days before opening. The flavors need time to mingle and deepen.
- Keep it cold: Store your jars in the fridge’s coldest spot. They’ll stay crisp and flavorful for months this way.
- Label creatively: Write the date with a marker – trust me, you’ll forget otherwise when you’ve got multiple batches going!
One last tip? Always make extra – these disappear faster than you’d think once friends and family get a taste!
Variations for Pickled Ramps Wild Leeks
Oh, the fun part! Once you’ve mastered the basic recipe, try these easy twists to make the pickles your own. I’ve experimented with all of these – some became instant favorites, others… well, let’s just say my dog was the only one who liked that dill-and-clove batch!
- Vinegar swap: Try apple cider vinegar for a fruitier tang, or rice vinegar for milder acidity. (White wine vinegar? Divine!)
- Spice it up: Add 1/2 teaspoon red pepper flakes or a sliced jalapeño to each jar for heat that creeps up on you.
- Herb infusion: Toss in a few fresh thyme sprigs or dill fronds with the ramps – the flavors bloom beautifully over time.
- Sweet & spicy: Replace half the sugar with honey and add 3-4 whole allspice berries for depth.
- Garlic lover’s: Add 2 smashed garlic cloves per jar – they’ll mellow as they pickle and complement the ramps perfectly.
Remember: The basic brine ratio (equal parts vinegar and water) is your canvas – have fun painting with flavors!
Serving Suggestions
Oh boy, where do I even start with how to eat these glorious pickled ramps? I swear, once you try them, you’ll find yourself sneaking them into everything! Here are my absolute favorite ways to enjoy them – and trust me, this is just the beginning of what you can do with these tangy gems:
- Next-level burgers: Toss a handful of chopped pickled ramps into your burger patties before grilling, then pile more on top with your cheese. Game. Changer.
- Breakfast superstar: Chopped up in scrambled eggs or folded into an omelet with some sharp cheddar? Oh yes. Sunday brunch just got fancy.
- Salad spark: Toss whole pickled ramps into potato salad, or chop them for a killer twist on a classic Greek salad. The brine makes an amazing dressing base too!
- Charcuterie magic: They pair perfectly with cured meats and strong cheeses on a board – that vinegary bite cuts through rich flavors beautifully.
- Sandwich secret weapon: Pile them high on roast beef or turkey sandwiches instead of plain pickles. Your BLT will never be the same.
- Cocktail companion: My uncle swears by dropping a pickled ramp into his Bloody Mary – the garlicky brine mixes right into the drink!
- Pizza topping: After baking, scatter chopped pickled ramps over your pizza for a bright, tangy contrast to gooey cheese.
The best part? These are just the ideas I’ve tried – you’ll discover your own favorite ways to use them! I keep a jar on my kitchen counter at all times (much to my husband’s amusement) because I add them to practically everything. Last week I even stirred some into my tuna salad instead of celery – zero regrets!
Storage and Reheating
Okay, let’s talk about keeping these pickled ramps wild leeks at their absolute best! Here’s the thing – if you’re anything like me, they probably won’t last long enough for storage to be an issue. But just in case you manage to practice some self-control (not my strong suit), here’s how to keep them fresh and delicious:
Refrigerator Storage
For everyday keeping, the fridge is your best friend:
- Store your sealed jars in the coldest part of the fridge (usually the back, bottom shelf)
- They’ll stay crisp and flavorful for up to 3 months this way!
- Always use clean utensils when fishing some out – no double-dipping to prevent contamination
Water Bath Canning for Long-Term Storage
Want to keep them longer? Here’s how my grandma taught me to preserve them properly:
- After filling and sealing your jars, process them in a boiling water bath for 10 minutes
- Make sure jars are fully submerged with at least 1 inch of water above them
- Let them cool completely before checking the seals – you should hear that satisfying “pop!”
- Properly canned, they’ll keep for up to a year in a cool, dark place
One important note: Once opened, transfer any unused pickled ramps to the fridge and enjoy within 2 weeks. And reheating? Don’t bother! These are meant to be enjoyed cold or at room temperature – that bright, tangy flavor is best when they’re not warmed up.
Nutritional Information
Now, I’m no nutritionist, but I know folks like to have an idea of what they’re eating. Keep in mind these numbers are just estimates – your actual results might vary slightly depending on your exact ingredients. Here’s the scoop per 1/4 cup serving of these tangy pickled ramps wild leeks:
- Calories: 20
- Total Fat: 0g
- Sodium: 400mg
- Total Carbohydrates: 4g
- Fiber: 1g
- Sugar: 1g
- Protein: 0g
Honestly, the best part (besides the flavor) is that they’re virtually fat-free and low-calorie – meaning you can pile them on everything guilt-free! That sodium number might look high, but remember you’re not eating the whole jar in one sitting (unless it’s one of those days – no judgment here). The vinegar and spices do all the work, keeping these pickles light while packing maximum flavor.
Frequently Asked Questions
I get so many questions about these pickled ramps wild leeks – seems like everyone wants to make sure they’re doing it right! Here are the answers to the ones I hear most often:
Q1. Can I use regular leeks instead of wild ramps?
Oh honey, I’ve tried – and it’s just not the same! Regular leeks lack that wonderful garlicky punch and tender texture that makes ramps special. If you absolutely must substitute, try combining green onions with a clove of garlic, but I highly recommend waiting for real ramps.
Q2. How long until the pickled ramps are ready to eat?
Patience is key here! While you could sneak a taste after 2-3 days, they really need at least 5-7 days in the fridge for the flavors to fully develop. My uncle always waits 2 weeks – says it’s worth every day. (I usually crack after 5 days, though!)
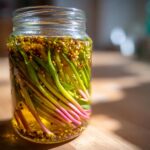
Q3. Why did my pickled ramps turn pink?
Don’t panic – that’s totally normal and actually a good sign! The ramps’ natural pigments react with the vinegar to create that beautiful pink hue. The color deepens over time – my oldest jars look like they’re filled with edible rubies!
Q4. Can I reduce the salt in this recipe?
You can, but be careful – the salt isn’t just for flavor, it helps preserve the ramps. I wouldn’t go below 2 teaspoons kosher salt per batch. If you’re watching sodium, try rinsing the pickles briefly before eating to remove some surface salt.
Q5. My jars didn’t seal – are the pickles ruined?
Not at all! Just pop them in the fridge right away and use within 3 months. My first few batches never sealed properly either – turns out I was over-tightening the bands. Leave them just finger-tight next time!
Share Your Experience
You know what I love most about sharing this pickled ramps wild leeks recipe? Hearing how it turns out in YOUR kitchen! Every batch tells a story – whether it’s your first time pickling or you’re a seasoned pro putting your own spin on it. My cousin texted me last week with a photo of her jars, proudly showing off the gorgeous pink hue they developed (and confessing she’d already eaten half a jar straight from the fridge – I don’t blame her one bit!).
Some of my favorite kitchen memories come from swapping stories about recipe experiments – like the time my neighbor added extra garlic and declared it “life-changing,” or when my aunt accidentally used double the peppercorns and ended up loving the extra kick. That’s the beauty of these pickles – they’re wonderfully forgiving and endlessly adaptable.
If you give this recipe a try, I’d be tickled pink (just like those ramps!) to hear how it went for you. Did you stick to the classic version or try one of the fun variations? Maybe you discovered an incredible new way to serve them that I haven’t tried yet? Every note in the comments becomes part of our shared kitchen adventure – the successes, the happy accidents, even the “oops” moments that turned into delicious discoveries! You can also find more inspiration on Pinterest.
PrintTangy Pickled Ramps Wild Leeks Recipe in Just 7 Days
Pickled ramps (wild leeks) are a tangy, flavorful condiment. They add a punch to salads, sandwiches, and more.
- Prep Time: 15 minutes
- Cook Time: 10 minutes
- Total Time: 25 minutes
- Yield: 2 pints 1x
- Category: Condiment
- Method: Pickling
- Cuisine: American
- Diet: Vegetarian
Ingredients
- 1 pound ramps (wild leeks), cleaned and trimmed
- 1 cup white vinegar
- 1 cup water
- 1 tablespoon kosher salt
- 1 tablespoon sugar
- 1 teaspoon black peppercorns
- 1 teaspoon mustard seeds
- 1 bay leaf
Instructions
- Sterilize jars and lids by boiling them for 10 minutes.
- Pack the cleaned ramps tightly into the sterilized jars.
- In a saucepan, combine vinegar, water, salt, sugar, peppercorns, mustard seeds, and bay leaf.
- Bring the mixture to a boil, then simmer for 5 minutes.
- Pour the hot brine over the ramps, leaving 1/2 inch headspace.
- Seal the jars and let them cool to room temperature.
- Store in the refrigerator for at least 1 week before eating.
Notes
- Use only fresh, firm ramps.
- Store pickled ramps in the fridge for up to 3 months.
- For longer storage, process jars in a water bath for 10 minutes.
Nutrition
- Serving Size: 1/4 cup
- Calories: 20
- Sugar: 1g
- Sodium: 400mg
- Fat: 0g
- Saturated Fat: 0g
- Unsaturated Fat: 0g
- Trans Fat: 0g
- Carbohydrates: 4g
- Fiber: 1g
- Protein: 0g
- Cholesterol: 0mg