
Oh my gosh, let me tell you about my love affair with pickled habanero peppers! I first tried them at this tiny taco stand in Mexico City – one bite and I was hooked. That perfect balance of fiery heat and tangy vinegar just blew my mind. Now I keep a jar in my fridge at all times because, trust me, they make everything better. Your tacos? Elevated. Your eggs? Transformed. Even your boring old sandwich? Suddenly exciting! What I love most is how the pickling process tames the habanero’s raw heat just enough while keeping that incredible fruity flavor. These little fireballs are about to become your new kitchen staple – and the best part? They’re ridiculously easy to make at home.

Why You’ll Love These Pickled Habanero Peppers
Let me count the ways these fiery little peppers will steal your heart:
- That addictive spicy-tangy kick that wakes up any dish (I put them on everything from morning eggs to midnight snacks)
- Super simple to make – just slice, boil, and pour (even my kitchen-challenged cousin nailed it)
- They keep forever in the fridge (mine never last more than a month because I use them so much)
- Crazy versatile – toss them in tacos, pizza, marinades, or even cocktails (yes, cocktails!)
Once you try homemade, you’ll never go back to store-bought!
Ingredients for Pickled Habanero Peppers
Alright, let’s gather our fiery little army! Here’s exactly what you’ll need to make these addictive pickled habaneros (and yes, I’ve learned these measurements through many happy – and a few too spicy – experiments):
- 10 fresh habanero peppers, thinly sliced (wear gloves! I learned this the hard way when I rubbed my eye mid-prep – ouch!)
- 1 cup white vinegar (the cheap stuff works perfectly fine here)
- 1 cup water (filtered if your tap water tastes funky)
- 1 tablespoon kosher salt (that coarse, flaky kind that makes everything better)
- 1 tablespoon white sugar (just enough to balance the heat without making it sweet)
- 3 garlic cloves, crushed (because everything’s better with garlic)
- 1 teaspoon black peppercorns (the whole ones, not ground – they’ll float around looking pretty in the jar)
That’s it! Simple ingredients for maximum flavor payoff. You probably have most of this in your pantry already.
Equipment You’ll Need
Grab these basics before you start (no fancy gadgets required!):
- 1 pint glass jar with lid
- Small saucepan
- Rubber gloves (seriously, don’t skip these)
- Sharp knife
How to Make Pickled Habanero Peppers
Okay, fire lovers – let’s turn these habaneros into your new favorite condiment! I promise it’s easier than you think, especially if you follow these steps carefully (and keep those gloves on!).
Sterilizing the Jar
First things first – we need a squeaky clean jar! I just toss my glass jar (and lid) into a pot of boiling water for a solid 10 minutes. This kills any nasty germs that could spoil our peppers. Fish them out with tongs and let them air dry upside down on a clean towel. No wiping – we don’t want to reintroduce any bacteria!
Preparing the Brine
Now, for the magic potion that makes these peppers irresistible: In your saucepan, combine the vinegar, water, salt, sugar, and peppercorns. Crank the heat to medium-high and stir until everything dissolves. Once it comes to a rolling boil (you’ll see big bubbles popping at the surface), let it go for exactly 1 minute – this ensures the flavors meld perfectly.
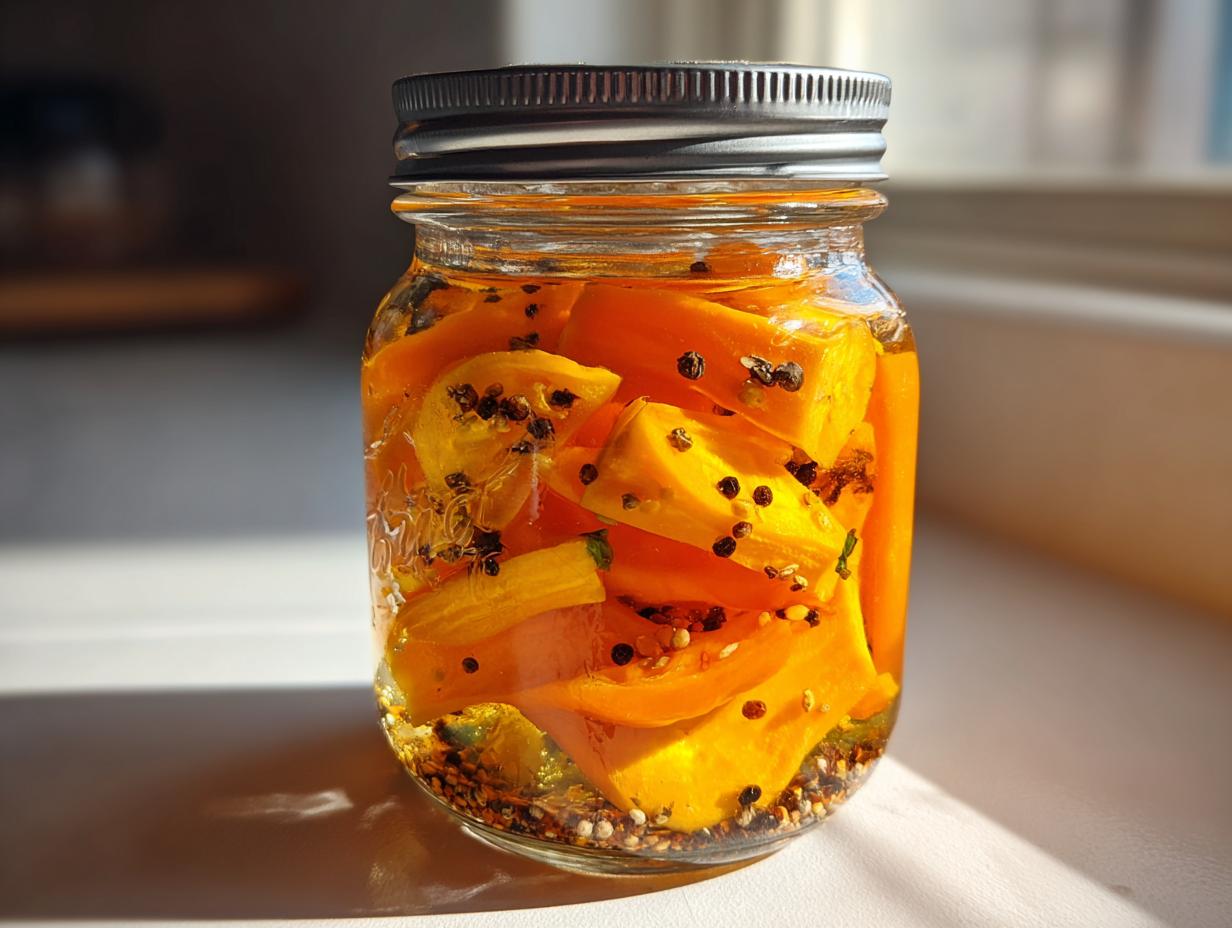
Packing and Sealing
Gloves on! Carefully layer your sliced habaneros and crushed garlic into the sterilized jar – I like to make pretty alternating layers, but honestly, just getting them all in there works too. Slowly pour the hot brine over the peppers, leaving about 1/2 inch of space at the top. Screw the lid on tight (use a towel if it’s still hot) and give it a gentle shake to distribute everything. Now the hard part – waiting! Let your jar cool to room temperature, then tuck it in the fridge for at least 3 days before digging in. The longer they sit, the better they get!
Tips for Perfect Pickled Habanero Peppers
After making dozens of batches (and a few fiery mistakes), here are my can’t-miss tips:
- Glove game strong – I once forgot and touched my nose… tears were shed
- Want it sweeter? Add an extra teaspoon of sugar (but don’t overdo it – the tang is key!)
- Use airtight jars and always refrigerate – no one wants moldy peppers
- The brine should fully cover the peppers – press them down with a clean spoon if needed
- Wait the full 3 days – patience makes the flavor magic happen!
Variations for Pickled Habanero Peppers
Want to mix things up? Try tossing in sliced carrots for crunch, thin red onion rings for bite, or a cinnamon stick for warmth. My wildcard? A splash of orange juice in the brine – trust me, it’s magic with the habaneros’ fruity heat!
Serving Suggestions
Oh, where don’t I use these fiery little gems? My absolute favorite is tossing them on breakfast tacos – that vinegar kick cuts right through the richness of eggs and cheese. They’re killer on grilled chicken (just chop some into your marinade), and I always sneak a few into my bloody marys for an extra punch. Pro tip: the brine makes an amazing spicy vinegar for dressings! These beauties keep happily in your fridge for up to 3 months – if you can resist eating them all in one go, that is.
Nutritional Information
Just a heads up – these numbers are estimates per tablespoon (values change based on your exact ingredients). Mostly we’re talking minimal calories with a nice little vitamin C kick from those fiery habaneros!
Frequently Asked Questions
How long do pickled habanero peppers last?
These fiery beauties will keep for up to 3 months in your fridge – if you can resist eating them all first! Just make sure they’re always submerged in brine and stored in an airtight jar. I date my jars because… well, I’ve never actually had one last the full 3 months!
Can I make them less spicy?
Absolutely! Remove the seeds and white membranes (that’s where most heat lives) before slicing. You can also add more sugar to balance the heat – try 2 tablespoons instead of 1. Or toss in some carrot slices to absorb some of that fiery kick!
Are pickled habaneros gluten-free?
Yes! All our ingredients – peppers, vinegar, salt, sugar – are naturally gluten-free. Just double-check your vinegar brand if you’re super sensitive (some malt vinegars contain gluten, but plain white vinegar is safe).
Can I use different peppers?
Of course! Jalapeños work great for milder heat, or go wild with scotch bonnets if you’re a real heat seeker. The pickling magic works on any pepper – just adjust the sugar to match their natural sweetness.
For more delicious recipes and inspiration, check out our Pinterest page!
PrintFiery Pickled Habanero Peppers: 10-Second Spicy Obsession
Spicy pickled habanero peppers to add heat to your dishes.
- Prep Time: 15 mins
- Cook Time: 10 mins
- Total Time: 25 mins
- Yield: 1 pint jar 1x
- Category: Condiment
- Method: Pickling
- Cuisine: Mexican
- Diet: Vegan
Ingredients
- 10 habanero peppers, sliced
- 1 cup white vinegar
- 1 cup water
- 1 tbsp salt
- 1 tbsp sugar
- 3 garlic cloves, crushed
- 1 tsp black peppercorns
Instructions
- Sterilize a glass jar by boiling it for 10 minutes.
- Pack sliced habaneros and garlic into the jar.
- Heat vinegar, water, salt, sugar, and peppercorns in a saucepan until boiling.
- Pour the hot liquid over the peppers in the jar.
- Seal the jar and let it cool to room temperature.
- Refrigerate for at least 3 days before using.
Notes
- Wear gloves when handling habaneros.
- Store in the fridge for up to 3 months.
- Adjust sugar if you prefer sweeter pickles.
Nutrition
- Serving Size: 1 tbsp
- Calories: 5
- Sugar: 0.5g
- Sodium: 100mg
- Fat: 0g
- Saturated Fat: 0g
- Unsaturated Fat: 0g
- Trans Fat: 0g
- Carbohydrates: 1g
- Fiber: 0.2g
- Protein: 0.1g
- Cholesterol: 0mg