

You know that satisfying crunch when you bite into the perfect dill pickle? That’s what I’m obsessed with recreating in my kitchen every summer. I’ll never forget the first time my grandmother handed me a jar of her homemade dill pickles – the crisp texture, that mouthwatering tang, and just the right amount of garlicky bite. When I popped open that jar at 12 years old, I became a pickle convert for life.
Now, after fifteen years of home canning (and plenty of failed batches along the way), I’ve perfected my own version of those crisp, tangy dill pickles. The secret? It’s all about the right balance of vinegar, fresh dill, and patience. These pickles aren’t just a snack – they’re little jars of summer you can enjoy all year round. And trust me, once you taste homemade, you’ll never go back to store-bought.
What makes these dill pickles special isn’t just the flavor – it’s that perfect snap when you bite in. Most commercial pickles can’t compare because they’re processed to death. My method keeps them crisp while packing in all that garlic-dill goodness we love. Whether you’re new to canning or a seasoned pro, this recipe will give you pickle perfection every time.
Why You’ll Love These Dill Pickles
These homemade dill pickles aren’t just another condiment – they’re a game changer. Once you try them, you’ll wonder why you ever settled for store-bought. Here’s what makes them so special:
- That perfect CRUNCH: Unlike mushy supermarket pickles, these stay crisp for months thanks to our careful processing method and fresh ingredients.
- Your flavor, your rules: Want extra garlic? Add more cloves. Prefer spicy? Toss in some red pepper flakes. This recipe is your pickle playground.
- Way cheaper than buying: A quart of homemade pickles costs about a third of what you’d pay at the store – and tastes ten times better.
- Eat now or later: Properly canned jars keep for a year unopened, meaning you can enjoy summer’s bounty all winter long.
- More than just a snack: These tangy spears brighten up sandwiches, burgers, potato salad – or make the perfect midnight fridge raid treat.
Seriously, once you taste that first crisp, garlicky bite, you’ll understand why I’m so obsessed with this recipe.
Ingredients for Dill Pickles
Alright, let’s talk about what you’ll need to make these crunchy, tangy beauties. I’m super picky about ingredients – and trust me, it makes all the difference in your final pickles. Here’s exactly what to grab:
- 4 lbs small cucumbers (look for unwaxed ones, about 3-5 inches long – the size matters for perfect pickle spears!)
- 8 cloves garlic (peeled and lightly crushed – don’t skip this! The crushing helps release that amazing garlic flavor)
- 4 sprigs fresh dill (with stems – the stems actually pack more flavor than you’d think)
- 2 cups white vinegar (5% acidity – this is non-negotiable for food safety)
- 4 cups water (filtered is best if your tap water has strong flavors)
- 1/4 cup pickling salt (must be non-iodized – regular table salt will make your brine cloudy)
- 2 tsp black peppercorns (whole, not ground – they add just the right bite)
- 2 tsp mustard seeds (yellow or brown both work great)
Pro tip from my many pickle experiments: Always, always check your cucumbers for wax coating before buying. That waxy shine? It prevents the brine from penetrating properly. Give them a good scrub under cold water too – any dirt can mess with your fermentation.
Equipment You’ll Need
Before we dive into pickle-making, let’s gather our tools. You don’t need fancy equipment, but these basics are non-negotiable for safe, successful canning:
- Large pot (big enough to fully submerge your jars with 1-2 inches of water above them)
- Sterilized jars with lids (pint or quart mason jars work best – and yes, sterilization is CRUCIAL to prevent spoilage)
- Canning tongs (regular kitchen tongs won’t grip jars securely when they’re boiling hot)
- Wide-mouth funnel (makes filling jars with hot brine way less messy)
- Cutting board and sharp knife (for prepping those crisp cucumbers)
Here’s my golden rule: If you skip sterilizing your jars, you might as well kiss those pickles goodbye. A quick boil or run through the dishwasher on sanitize mode makes all the difference between crisp success and mushy disappointment.
How to Make Dill Pickles
Okay, pickle pals – it’s showtime! Making dill pickles is easier than you think, but there are a few key steps you can’t rush. Follow these instructions carefully, and you’ll be rewarded with jars of crisp, tangy perfection.
Preparing the Cucumbers
First things first – let’s get those cucumbers ready for their brine bath:
- Wash cucumbers thoroughly under cold running water. Scrub gently if they’re extra dirty.
- Trim off both ends – about 1/8 inch from each side. This removes enzymes that can make pickles soft.
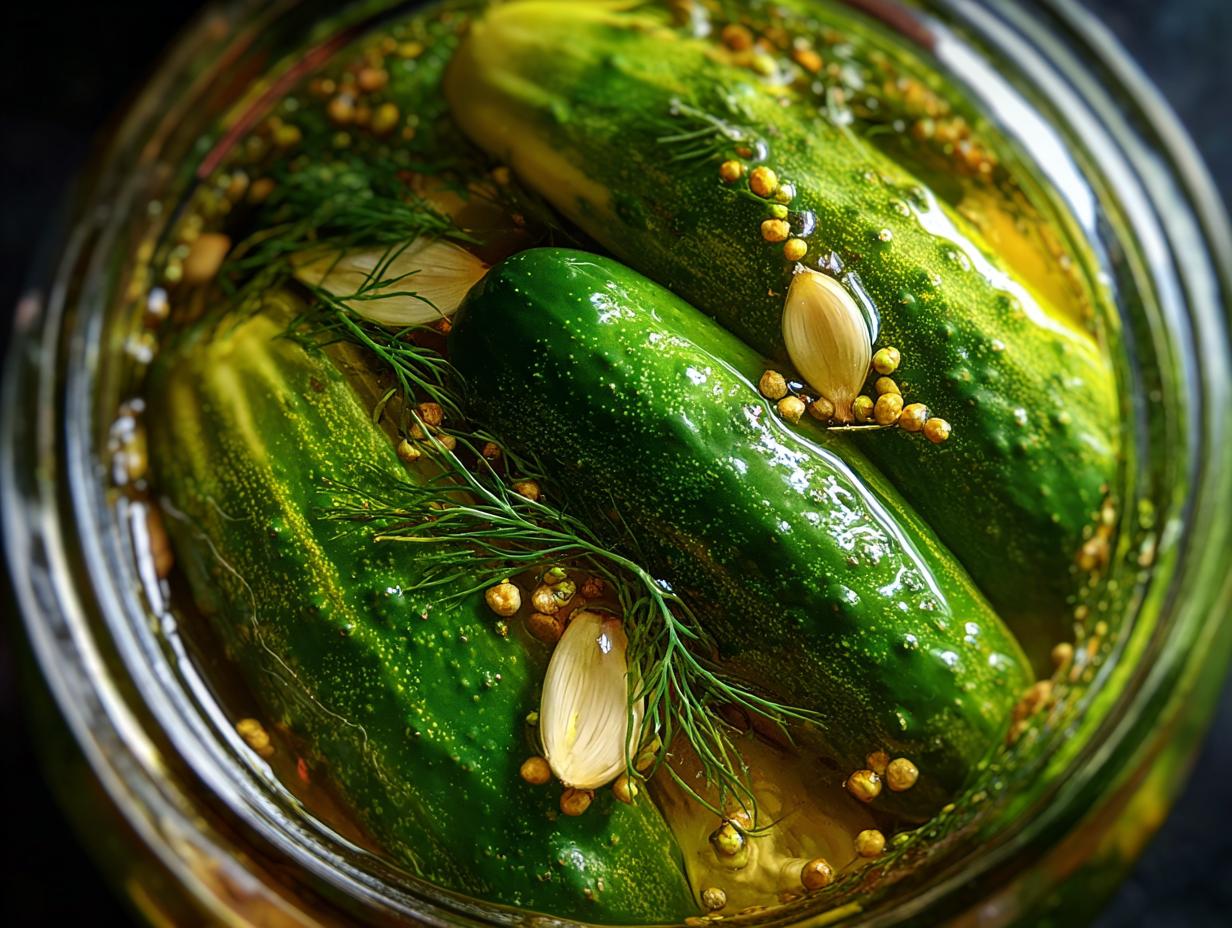
- Pack cucumbers vertically into sterilized jars. Really wedge them in there – tight packing prevents floating later.
- Tuck garlic cloves, dill sprigs, peppercorns, and mustard seeds between the cucumbers. I like to put some at the bottom and top for even flavor distribution.
Pro tip: If you’re making spears instead of whole pickles, cut them lengthwise into quarters first. Just don’t slice them too thin or they’ll get mushy.
Making the Brine
Now for the magic potion that transforms cucumbers into pickles:
- Combine water, vinegar, and pickling salt in your large pot. Give it a quick stir.
- Bring to a rolling boil over high heat. Once boiling, set a timer for 5 minutes – this ensures the salt fully dissolves.
- Reduce heat slightly to maintain a steady boil (but don’t let it go wild and evaporate too much).
Warning: That vinegar steam is potent! Turn on your kitchen fan or open a window unless you want your eyes watering.
Canning the Dill Pickles
Here’s where the real canning magic happens:
- Carefully pour the hot brine over packed cucumbers, leaving 1/2 inch headspace at the top. Use your funnel to avoid spills.
- Run a clean butter knife along the inside of each jar to release air bubbles. This helps prevent floating cucumbers later.
- Wipe jar rims with a clean, damp cloth to remove any brine or cucumber bits that could prevent sealing.
- Place lids on jars and screw bands on finger-tight (not too tight – air needs to escape during processing).
- Process jars in boiling water bath for 10 minutes (start timing once water returns to a full boil).
- Remove jars with canning tongs and let cool undisturbed for 12-24 hours. You should hear that satisfying “pop” as they seal!
Safety first: Always check seals before storing. If a lid flexes when pressed, refrigerate that jar and eat those pickles first.
Tips for Perfect Dill Pickles
After years of pickle experiments (and a few disasters), I’ve learned these foolproof tricks for dill pickle perfection every time:
- Fresh is everything: Use cucumbers within 24 hours of picking or buying. Once they start softening, you’ll never get that satisfying crunch.
- Pack tight, but not too tight: You want cucumbers snug, but leave some wiggle room for brine circulation. Overpacking leads to uneven pickling.
- Darkness is your friend: Store jars in a cool, dark place after processing. Sunlight can fade colors and weaken flavors over time.
- Patience pays off: I know it’s hard, but wait at least 2 weeks before opening. That’s when the magic happens – flavors mellow and blend perfectly.
Trust me on that last one – I’ve ruined many jars by cracking them open too soon! The wait is torture, but so worth it.
Dill Pickles Variations
Once you’ve mastered the basic recipe, it’s time to play pickle scientist! My kitchen adventures have led to some delicious twists on classic dill pickles. Here are my favorite ways to switch things up:
Spicy kick: Toss in 1-2 teaspoons of red pepper flakes per jar if you love heat. My husband swears by adding a sliced jalapeño to each jar – the seeds add serious fire!
Extra crunch: For that perfect snap, add a fresh grape or oak leaf to each jar. The natural tannins keep pickles crisp. (Yes, it sounds weird, but my grandma taught me this old-country trick!)
Sweet-tangy: Add 1 tablespoon of sugar to the brine for a bread-and-butter pickle vibe. Perfect for folks who find regular dills too puckery.
Storing and Serving Dill Pickles
Now that you’ve got these beautiful jars of homemade dill pickles, let’s talk about how to keep them perfect until you’re ready to enjoy them. Proper storage makes all the difference between “good” and “oh-my-goodness-I-need-another” pickles!
Unopened jars will stay crisp and flavorful at room temperature for up to a year – I store mine in a cool pantry away from direct sunlight. But here’s the kicker: once you pop that lid open, transfer any leftovers to the fridge. They’ll keep for another 2 months chilled, though let’s be real – in my house they never last that long!
Now for the fun part – serving ideas! These tangy spears aren’t just for snacking straight from the jar (though no judgment if that’s your move). They’re incredible:
- On sandwiches: A crisp dill pickle takes a basic deli sandwich to gourmet status. My current obsession? Pastrami on rye with extra pickles and mustard.
- In salads: Chop them up for potato salad or egg salad – that vinegar punch cuts through the mayo perfectly.
- With charcuterie: The acidity balances rich cheeses and cured meats beautifully. My friends go wild when I put out a board with these pickles.
- As a cocktail garnish: Swap olives for a pickle spear in your next Bloody Mary. Game changer.
Pro tip from my pickle-loving heart: Always serve them chilled for maximum crunch. That satisfying snap is half the experience!
Dill Pickles FAQ
Over the years, I’ve gotten the same pickle questions again and again from friends and family. Here are the answers to the big ones that’ll help you avoid common dill pickle pitfalls:
Can I use regular table salt instead of pickling salt?
Oh honey, no! I learned this the hard way when my first batch came out cloudy and slightly metallic. Table salt contains anti-caking agents and iodine that can make your brine look hazy and affect the flavor. Pickling salt is pure sodium chloride – it dissolves completely and keeps your pickles looking and tasting their best.
How long until my pickles are ready to eat?
I know the wait is torture, but resist opening those jars for at least 2 weeks! That’s when the magic really happens – the flavors mellow, the garlic infuses properly, and that perfect pickle tang develops. I’ve ruined many jars by sampling too early (whoops). Mark your calendar and practice some pickle patience – it’s worth it.
Why did my pickles turn out soft instead of crisp?
Ugh, the dreaded pickle mush! Nine times out of ten, this happens because the cucumbers got overcooked during processing. That’s why we stick to the exact 10-minute boiling time. Other culprits: using waxed cukes (the brine can’t penetrate), or not trimming the blossom ends (they contain enzymes that cause softening). Next time, set a timer and double-check your cucumber prep!
Nutritional Information
Okay, let’s be real – none of us are eating homemade dill pickles because they’re health food. But hey, it’s nice to know what you’re crunching into! Just remember these values are estimates – your exact nutrition will vary depending on your ingredients and how big your pickle spears are.
Per pickle (about 3-inch spear):
- Calories: 15
- Sodium: 590mg
- Total Carbs: 3g
- Fiber: 1g
- Sugar: 1g
- Protein: 0g
Now before you panic about the sodium – yes, pickles are salty! That’s how they preserve so beautifully. But here’s my pickle philosophy: You’re not eating the whole jar in one sitting (unless it’s that kind of day), so enjoy a few spears guilt-free. The vinegar gives you probiotics that are great for gut health too!
Pro tip: If you’re watching sodium, rinse pickles briefly before eating. It takes the edge off the salt while keeping all that delicious flavor.
Ready to Make Your Own Dill Pickles?
There you have it – everything I’ve learned through years of pickle experiments, failures, and triumphs! Now it’s your turn to experience the magic of homemade dill pickles. Trust me, once you taste that first crisp, garlicky spear from your own jar, you’ll understand why I’m so obsessed with this recipe.
Don’t be intimidated if this is your first time canning – we all start somewhere! Just follow each step carefully, and you’ll be rewarded with jars of tangy perfection that put store-bought pickles to shame. The best part? You can tweak the flavors exactly how you like them. Extra garlic? More dill? A spicy kick? Your pickle, your rules!
I’d love to hear how your pickle adventure goes. Did you stick with the classic recipe or try one of the fun variations? Any brilliant discoveries or hilarious mishaps along the way? Drop your pickle stories in the comments below – I read every one!
Now go forth and pickle, my friends. Your future self will thank you when you’re crunching into that perfect homemade spear months from now. Happy canning!
PrintCrispy Dill Pickles That Will Change Your Life Forever
Crisp and tangy homemade dill pickles, perfect for snacking or adding to sandwiches.
- Prep Time: 20 mins
- Cook Time: 10 mins
- Total Time: 30 mins
- Yield: 4 pints 1x
- Category: Preserving
- Method: Canning
- Cuisine: American
- Diet: Vegan
Ingredients
- 4 cups water
- 2 cups white vinegar
- 1/4 cup pickling salt
- 4 lbs small cucumbers
- 8 cloves garlic, peeled
- 4 sprigs fresh dill
- 2 tsp black peppercorns
- 2 tsp mustard seeds
Instructions
- Wash cucumbers and trim ends.
- Combine water, vinegar, and pickling salt in a pot. Bring to a boil.
- Pack cucumbers, garlic, dill, peppercorns, and mustard seeds into sterilized jars.
- Pour the hot brine over the cucumbers, leaving 1/2 inch headspace.
- Seal jars and process in a boiling water bath for 10 minutes.
- Cool jars and store for at least 2 weeks before eating.
Notes
- Use fresh, firm cucumbers for best results.
- Sterilize jars before use to prevent spoilage.
- Store pickles in a cool, dark place.
Nutrition
- Serving Size: 1 pickle
- Calories: 15
- Sugar: 1g
- Sodium: 590mg
- Fat: 0g
- Saturated Fat: 0g
- Unsaturated Fat: 0g
- Trans Fat: 0g
- Carbohydrates: 3g
- Fiber: 1g
- Protein: 0g
- Cholesterol: 0mg