

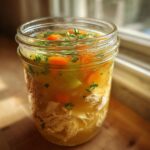
There’s nothing quite like the smell of homemade chicken soup simmering on the stove – that comforting aroma of tender chicken, fresh veggies, and herbs that instantly makes everything feel right in the world. But here’s my little secret: I don’t just make one pot at a time anymore. I make gallons! Canning chicken soup has completely changed my meal prep game, and I’m obsessed with having jars of this golden goodness ready whenever I need them.
I remember my first attempt at canning soup – I was nervous about doing it wrong, but once I got the hang of proper pressure canning techniques, there was no going back. Now my pantry stays stocked with this nourishing soup that’s perfect for busy weeknights, unexpected guests, or those “I don’t feel like cooking” days. Just pop open a jar, heat, and boom – homemade comfort in minutes!
But let me be clear: safety comes first when canning. I learned the hard way that you can’t just wing it with soup recipes – you need tested methods and proper equipment. That’s why I’m sharing my tried-and-true approach that keeps my family safe while preserving all that delicious homemade flavor.

Why You’ll Love This Canning Chicken Soup
Trust me, once you try canning your own chicken soup, you’ll wonder why you didn’t start sooner. This recipe is a total game-changer for so many reasons:
- Homemade goodness, anytime: Nothing beats that “just made” taste, even months later. The flavors actually deepen as they sit in the jar!
- Emergency meal saver: Sick day? Snowstorm? Forgot to meal prep? Just grab a jar and heat – instant comfort food without the preservatives.
- Budget-friendly: One whole chicken stretches into multiple meals. I save even more by using leftover veggie scraps for the broth.
- Nutrient-packed: All that collagen from simmering bones? Your immune system will thank you come cold season.
- Time-saving magic: Spend one afternoon canning, and you’ve got ready-to-eat meals for weeks. (No more takeout guilt!)
The best part? Opening a jar still gives me that proud “I made this!” feeling – even on my laziest days.
Ingredients for Canning Chicken Soup
What I love about this recipe is how simple the ingredients are – just real food that works together perfectly. Here’s exactly what you’ll need (and yes, I’m picky about prep – it makes all the difference!):
- 1 whole chicken (3-4 lbs), cut into pieces – I like to leave the bones in while simmering for extra-rich broth
- 8 cups water – filtered if your tap water has a strong taste
- 2 carrots, chopped – about ½-inch pieces hold up best during canning
- 2 celery stalks, chopped – include those leafy tops for extra flavor!
- 1 onion, diced – yellow onions are my go-to for their sweetness
- 2 cloves garlic, minced – fresh only, none of that powdery stuff
- 1 tsp salt – I use sea salt, but any non-iodized salt works
- ½ tsp black pepper – freshly ground if you have it
- 1 tsp dried thyme – rub between your fingers to wake up the oils
- 1 bay leaf – the secret background note that ties it all together
See? Nothing fancy – just honest ingredients that turn into liquid gold. Pro tip: always prep everything before starting – canning waits for no one!
Equipment Needed for Canning Chicken Soup
Listen, you can’t just grab any old pots and pans for this – proper canning requires the right tools to keep things safe and easy. Here’s what I always have ready:
- Large stockpot (8+ quarts) – Big enough for all that chicken and broth to simmer happily
- Pressure canner (not a pressure cooker!) – This is non-negotiable for safe soup canning
- Canning jars (pints or quarts) – I prefer wide-mouth jars – way easier to fill
- Canning funnel – Saves you from broth spills (learned that the messy way)
- Jar lifter – Those jars get HOT – this tool is a finger-saver
- Ladle – For getting every last drop of that golden broth into jars
Bonus items I love: magnetic lid lifter (no more fishing for lids!) and bubble remover/headspace tool. Worth every penny when you’re canning big batches!
How to Make Canning Chicken Soup
Alright, let’s get down to business! I’ll walk you through my foolproof method step by step. Just follow along, and you’ll have shelf-stable chicken soup that tastes like it came straight from grandma’s kitchen. Safety first though – wash those hands and keep your workspace clean!
Preparing the Soup Base
First things first – let’s build that flavor foundation. In your big stockpot, combine the chicken pieces (bones and all – that’s where the magic happens), water, carrots, celery, onion, garlic, and all your seasonings. Now here’s my trick: bring it to a rolling boil first, then immediately reduce to the gentlest simmer you can manage. You want barely a bubble breaking the surface.
Set your timer for 1.5 hours – no peeking! Well, maybe a little peek to skim off any foam that forms in the first 15 minutes. That foam isn’t bad for you, but removing it gives you clearer broth. The long, slow simmer coaxes out all that collagen and flavor from the bones. Your kitchen should smell heavenly by now!
Shredding the Chicken and Straining Broth
Okay, time for the most satisfying part! Carefully fish out the chicken pieces with tongs and let them cool just enough to handle. Pro tip: I use two forks to shred while it’s still warm – the meat practically falls off the bones. Toss the skin and bones, but keep every bit of that tender meat!
Now, strain the broth through a fine mesh sieve into another pot. You’ll be amazed how much clearer it gets! I like to press gently on the veggies to extract every drop of flavor, then compost the spent vegetables. Return the shredded chicken to that golden broth and give it one last boil – this ensures everything stays piping hot for canning.

Canning the Chicken Soup
Here comes the important part! While your soup boils, get your jars hot in the canner (this prevents breakage). Use your funnel to ladle in the hot soup, leaving 1-inch headspace – don’t eyeball this, use a headspace tool! Wipe the rims spotless with a damp cloth, then center the lids and screw bands on finger-tight.
Process pints for 75 minutes or quarts for 90 minutes at 10 lbs pressure (adjust for altitude if needed). When time’s up, turn off heat and let the pressure drop naturally – no peeking! Those jars will sing their little “ping” songs as they seal. Music to a canner’s ears!
Tips for Perfect Canning Chicken Soup
After years of trial and error (and a few messy kitchen disasters), I’ve picked up some golden rules for canning chicken soup like a pro:
- Taste before you can! Seasoning gets locked in during processing, so adjust salt and pepper now – you can always add more when reheating.
- Fresh herbs make all the difference – I sneak in a sprig of rosemary or sage sometimes for extra depth.
- Check those seals! After jars cool, press the center of each lid – if it pops, refrigerate and eat within a week.
- Leave proper headspace – too full and you’ll get siphoning; too empty and jars might not seal.
- Label with dates – trust me, you’ll forget when you made them otherwise!
My biggest tip? Relax and enjoy the process – the reward of homemade soup anytime is worth every minute!
Storing and Reheating Canned Chicken Soup
Now that you’ve got those beautiful jars of soup, let’s talk about keeping them perfect until you’re ready to dig in! Properly sealed jars will last 1-2 years in a cool, dark pantry – though mine never lasts that long because we gobble it up so fast. Just make sure to store them without the rings (they can hide unsealed jars) and away from heat sources.
When it’s time to eat, here’s how I do it: dump the whole jar into a pot and bring it to a rolling boil for at least 5 minutes (safety first!). Or if I’m feeling lazy, I’ll microwave it in a bowl (stirring halfway) until steaming hot. Either way, that first spoonful always tastes like I just made it fresh – pure magic!
Nutritional Information for Canning Chicken Soup
Now, I’m no dietitian, but here’s the scoop on what’s in each comforting bowl! These numbers are estimates – your exact counts will depend on your chicken’s size and veggie portions. Per 1-cup serving, you’re looking at:
- 120 calories – light but satisfying
- 15g protein – thanks to all that chicken goodness
- 6g carbs – mostly from the wholesome veggies
- 4g fat – just enough to carry all those delicious flavors
It’s naturally low in sugar (only 2g) and packed with minerals from the bone broth. I call it “medicine in a jar” when cold season hits!
Frequently Asked Questions About Canning Chicken Soup
I get asked about canning chicken soup all the time – here are the questions that pop up most often in my kitchen (and the honest answers I’ve learned through trial and error!):
“How long does canned chicken soup last?”
Properly processed jars stay good for 1-2 years in a cool, dark place. But honestly? Mine never lasts that long because we eat it so fast! Just check seals before using – if the lid pops when pressed, toss it.
“Can I add noodles before canning?”
Oh honey, no! Noodles turn to absolute mush during processing. I learned this the hard way. Now I always add them fresh when reheating – just boil some pasta separately and stir it into the hot soup.
“What pressure should I use for high-altitude canning?”
Altitude matters! For every 1,000 feet above sea level, add 1/2 pound of pressure. So at 5,000 feet? Process at 12 lbs pressure instead of 10. Your local extension office has exact charts if you’re unsure.
“Can I use frozen chicken?”
Technically yes, but fresh makes better broth! Frozen chicken releases more water, diluting your soup’s flavor. If you must use frozen, thaw completely first and pat dry.
“Why can’t I water bath can soup?”
Safety first! Low-acid foods like chicken soup require pressure canning to kill botulism spores. No shortcuts here – trust me, it’s not worth the risk!
Share Your Canning Chicken Soup Experience
Now I want to hear from you! Did your kitchen fill with that amazing chicken soup aroma? Did your jars seal with that satisfying “ping”? Drop a comment below – tell me about your canning adventures, any clever twists you tried, or how you felt opening that first jar months later. Your stories make this recipe come alive!
For more canning inspiration, check out my Pinterest boards!
Print“Perfect Canning Chicken Soup in Just 5 Easy Steps”
A simple and nutritious homemade chicken soup that’s perfect for canning and storing for later use.
- Prep Time: 30 minutes
- Cook Time: 2 hours
- Total Time: 2 hours 30 minutes
- Yield: 6-8 servings 1x
- Category: Soup
- Method: Pressure Canning
- Cuisine: American
- Diet: Low Fat
Ingredients
- 1 whole chicken (about 3–4 lbs), cut into pieces
- 8 cups water
- 2 carrots, chopped
- 2 celery stalks, chopped
- 1 onion, diced
- 2 cloves garlic, minced
- 1 tsp salt
- 1/2 tsp black pepper
- 1 tsp dried thyme
- 1 bay leaf
Instructions
- Place chicken, water, carrots, celery, onion, garlic, salt, pepper, thyme, and bay leaf in a large pot.
- Bring to a boil, then reduce heat and simmer for 1.5 hours.
- Remove chicken from the pot and shred the meat, discarding bones and skin.
- Strain the broth and return it to the pot.
- Add shredded chicken back to the broth and bring to a boil.
- Ladle hot soup into sterilized canning jars, leaving 1-inch headspace.
- Process in a pressure canner at 10 lbs pressure for 75 minutes (pints) or 90 minutes (quarts).
Notes
- Use fresh, high-quality ingredients for best results.
- Adjust seasoning to taste before canning.
- Always follow proper canning safety guidelines.
Nutrition
- Serving Size: 1 cup
- Calories: 120
- Sugar: 2g
- Sodium: 400mg
- Fat: 4g
- Saturated Fat: 1g
- Unsaturated Fat: 2g
- Trans Fat: 0g
- Carbohydrates: 6g
- Fiber: 1g
- Protein: 15g
- Cholesterol: 40mg