

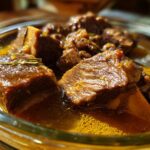
Let me tell you about my little canning revelation – beef short ribs! There’s something downright magical about popping open a jar months later and finding perfectly tender, fall-off-the-bone meat ready to transform into stews, tacos, or my favorite – straight from the jar with some crusty bread. I got hooked on canning beef short ribs after one crazy winter storm left me craving hearty meals without grocery runs. Now my pantry always has these ruby-red jars waiting like delicious emergency rations.
Canning beef short ribs isn’t just practical (though wow, is it ever!), it actually improves the meat’s texture. The pressure canning process breaks down tough connective tissues better than slow cooking. What comes out is this rich, fork-tender beef that’s already infused with flavor from the garlic and smoked paprika. My grandfather, an old ranch hand, would’ve called it “meat candy” – and he wasn’t wrong. Once you taste these, you’ll understand why I’m always stocking up when ribs go on sale.

Why You'll Love Canning Beef Short Ribs
Let me count the ways this method will change your kitchen game! First off, that glorious shelf life – properly canned ribs stay delicious for a full year in your pantry. No freezer burn worries, just grab-and-go protein whenever inspiration (or hunger) strikes.
The texture? Oh honey, it's like the ribs spent all day in your slow cooker. The pressure canner works magic on tough connective tissue, leaving you with meat so tender it practically melts on your tongue. Last week I dumped a jar into ramen broth and nearly cried from happiness.
Here’s my favorite part – ready-to-eat meals in minutes. Busy Tuesday night? Your future self will thank you when beef tacos come together faster than takeout. Plus, the flavor develops beautifully during storage. That smoked paprika and garlic? They become best friends in the jar.
Ingredients for Canning Beef Short Ribs
Alright, let’s talk ingredients – and I mean the good stuff. You’ll need about 4 pounds of beef short ribs (look for meaty ones with nice marbling – that fat equals flavor). I always use 1 tablespoon of kosher salt (trust me, it seasons better than table salt) and 1 teaspoon of freshly ground black pepper. Don’t skimp on the smoked paprika – just a teaspoon gives that deep, smoky backbone.
Now, here’s my secret weapon: 2 cloves of minced garlic per jar. It infuses the meat beautifully as it processes. For liquid, you’ve got options – 2 cups of water works, but beef broth takes it next level. If I’m feeling fancy, I’ll use half broth, half red wine (just don’t tell my grandma I’m wasting good wine on canning).
Equipment Needed for Canning Beef Short Ribs
Okay, let’s get real about gear – you absolutely need a pressure canner (not a water bath!) for meat. My trusty old Presto does the job beautifully. Grab pint or quart jars – wide-mouth makes packing those ribs way easier. Don’t forget new lids every time (the seals aren’t reusable, learned that the hard way). A jar lifter is your best friend for hot jars, and a funnel? Total game-changer for keeping rims clean. Oh! And bubble freer – sounds silly, but those trapped air pockets are sneaky!
How to Prepare Beef Short Ribs for Canning
First things first – let’s get those ribs ready for their cozy jar homes! I always start by trimming off any thick chunks of fat (leave some for flavor though – we’re not making health food here). Cut the ribs into pieces that’ll fit through your jar openings – about 2-inch chunks work perfectly for my wide-mouth pints.
Now for the fun part – seasoning! I mix the salt, pepper, and smoked paprika right on my cutting board and roll each rib piece in it like they’re getting a spicy massage. Pro tip: Let them sit with the rub for 15 minutes while you sterilize jars – the salt starts working its magic.
When packing the jars, think snug but not squished. I alternate meaty and bony pieces for even cooking, tucking in that minced garlic like little flavor surprises. Leave that crucial 1-inch headspace – I measure with my finger (from first knuckle to tip is about right). Too full and you’ll have a seal-breaking mess, too empty and the contents might float.
Hot liquid is your friend here! Whether using broth or water, heat it to a simmer before pouring over the ribs. This keeps everything at the right temp going into the canner – cold liquid means longer processing times and tougher meat.
Step-by-Step Guide to Canning Beef Short Ribs
Alright, let’s get these beauties canned! I’ll walk you through my foolproof method – the same one that’s kept my family stocked with tender ribs for years.
1. Prep your canner: Fill with 2-3 inches of water (follow your model’s manual) and get it heating while you pack jars. You want it steaming hot but not boiling when jars go in.
2. Pack those ribs tight: Remember how we prepped them? Now layer pieces vertically in sterilized jars, bony sides out. Leave that golden 1-inch headspace at the top!
3. Liquid time: Pour hot broth or water over ribs, keeping headspace consistent. Run a bubble freer around the edges – those sneaky air pockets can ruin your seal.
4. Seal it up: Wipe rims with vinegar-dampened cloth (removes grease better than water), center lids, and screw bands on fingertip-tight. No muscle needed here!
5. Processing magic: Load jars into canner with the rack, seal the lid, and vent for 10 full minutes before adding the weight. At sea level, process at 10 psi – 90 minutes for pints, 100 for quarts. High altitudes? Adjust pressure accordingly.
6. The waiting game: After processing, turn off heat and let pressure drop naturally. I set a timer for 45 minutes – rushing this risks siphoning (when liquid gets sucked out of jars).
7. Final checks: Remove jars carefully when pressure hits zero. Let cool 12 hours undisturbed, then test seals by pressing lids – no popping means success! Refrigerate any unsealed jars immediately.
Pro tip: If liquid looks cloudy, don’t panic! That’s just proteins from the meat – totally normal and safe. The ribs will be fall-apart tender and packed with flavor.
Safety Tips for Canning Beef Short Ribs
Listen, I know canning meat can feel intimidating, but stick with me – these simple rules keep everything safe and delicious. First rule: Always use a pressure canner (not a water bath!) for meats – that 240°F+ temperature is non-negotiable for killing bacteria. I follow USDA processing times like gospel – 90 minutes for pints, 100 for quarts at 10 psi.
Check every single jar seal after cooling – press the center; it shouldn’t flex or pop. Any doubt? Toss it or refrigerate immediately. And here’s my golden rule: Store your canned ribs in a cool, dark place (basement shelves beat sunny cabinets). If a jar ever looks swollen or smells off when opened? Straight to the trash – no tasting “just in case”!
Storing and Using Canned Beef Short Ribs
Here’s the beautiful part – those jars of beefy gold will keep beautifully for a full year in your pantry (if you can resist eating them that long!). I store mine in the coolest, darkest spot in the house – heat and light are flavor killers. When you’re ready to feast, just pop open a jar and you’ve got instant gourmet meals. My favorite trick? Dump the whole jar (juice and all!) into a skillet and simmer for 5 minutes – the ribs get even more tender and the liquid makes an amazing sauce.
These bad boys shine in so many dishes! Shred them for tacos, toss into ramen for instant luxury, or make the world’s easiest beef stew by adding some jarred veg. My kids go wild when I mix the meat with BBQ sauce for sliders. The bone-in pieces? Throw them straight into soups for insane flavor. Just remember – once opened, treat them like fresh meat and use within 3-4 days.
Nutritional Information for Canned Beef Short Ribs
Now let’s talk nutrition – but remember, these are just estimates! Your exact numbers might dance around a bit depending on the ribs’ fat content and your exact ingredients. A half-pint serving typically packs about 320 calories with 28g protein – perfect for keeping you full. You’re looking at 22g fat (9g saturated), but hey, that’s where all the flavor lives! Zero carbs, and that 480mg sodium? That’s why I use low-sodium broth when I’m watching salt. Not health food, but pure comfort in a jar.
Frequently Asked Questions About Canning Beef Short Ribs
Q1. Can I adjust the processing time if my ribs are extra meaty?
Don’t even think about it! Those USDA-approved processing times exist for a reason – they ensure all that delicious beef reaches safe temperatures throughout. Extra meat just means packing jars more carefully (I alternate meaty and bony pieces). Stick to 90 minutes for pints, 100 for quarts at 10 psi.
Q2. Should I trim all the fat off the ribs before canning?
Oh honey, no! That fat equals flavor and keeps the meat moist during processing. Just trim any thick chunks (like over 1/4 inch) that might interfere with sealing. The rest melts into pure deliciousness during canning.
Q3. Can I use quart jars instead of pints?
Absolutely! Quarts are perfect if you’re feeding a crowd or want meal-sized portions. Just remember to increase processing time to 100 minutes. My tip? Pack bony pieces at the bottom where heat penetrates slower.
Q4. Why did some liquid escape my jars during processing?
Probably siphoning – happens if you rush the cooling process! Always let pressure drop naturally (that 45-minute wait isn’t optional). Lost liquid doesn’t affect safety if seals are good, though the top meat might darken.
Q5. Can I add vegetables to the jars with the ribs?
Hold your horses! Veggies and meat have different processing times – mixing them risks underprocessing one or the other. Can them separately, then combine when cooking. Trust me, your taste buds (and stomach) will thank you.
Canning Beef Short Ribs for Tender 1-Year Meals
Preserve beef short ribs by canning them for long-term storage. This method locks in flavor and ensures tender, ready-to-eat meat.
- Prep Time: 30 minutes
- Cook Time: 90 minutes
- Total Time: 2 hours
- Yield: 4 pints 1x
- Category: Preserves
- Method: Pressure Canning
- Cuisine: American
- Diet: Halal
Ingredients
- 4 lbs beef short ribs
- 1 tbsp salt
- 1 tsp black pepper
- 2 cups water or beef broth
- 2 cloves garlic, minced
- 1 tsp smoked paprika
Instructions
- Trim excess fat from short ribs and cut into pieces that fit your jars.
- Season ribs with salt, pepper, and smoked paprika.
- Pack ribs tightly into sterilized jars, leaving 1-inch headspace.
- Add minced garlic and pour water or broth over ribs, maintaining headspace.
- Wipe jar rims, apply lids, and process in a pressure canner at 10 psi for 90 minutes (pints) or 100 minutes (quarts).
- Remove jars and let cool for 12 hours before checking seals.
Notes
- Use only USDA-approved canning methods for meat.
- Check jar seals before storage – lids should not flex when pressed.
- Store canned ribs in a cool, dark place for up to 1 year.
Nutrition
- Serving Size: 1/2 pint
- Calories: 320
- Sugar: 0g
- Sodium: 480mg
- Fat: 22g
- Saturated Fat: 9g
- Unsaturated Fat: 10g
- Trans Fat: 1g
- Carbohydrates: 0g
- Fiber: 0g
- Protein: 28g
- Cholesterol: 85mg