
You know those nights when you’re craving crispy French fries but don’t want to deal with peeling and cutting potatoes? That’s exactly why I fell in love with canning French fries! I’ll never forget the first time I pulled a jar of homemade fries from my pantry – it felt like magic having perfectly preserved potatoes ready whenever the fry craving hit.
Canning French fries might sound unusual, but trust me, it’s a game-changer for busy cooks and homesteaders alike. My grandmother taught me this method during peak harvest season when our potato bins overflowed. Now I always keep several jars put up – they’re perfect for quick meals, camping trips, or unexpected guests. The best part? These canned fries maintain their texture beautifully when you’re ready to fry or bake them up golden brown.
Why You’ll Love Canning French Fries
Oh, where do I even start with the perks of canning French fries? First off, imagine pulling out a jar of perfectly preserved potatoes on a busy weeknight—no peeling, no chopping, just ready-to-fry goodness. Here’s why this method has become my not-so-secret kitchen hack:
- Long shelf life: These babies stay good for up to a year, so you’ll always have fries on standby.
- Ready in a snap: Craving crispy fries? Just drain, fry (or bake), and you’re done.
- Texture magic: The blanching and canning process locks in that perfect fry texture—crispy outside, fluffy inside.
- Budget-friendly: Buying potatoes in bulk? This is the smartest way to preserve them without waste.
Seriously, once you try canning French fries, you’ll wonder how you ever lived without them!
Ingredients for Canning French Fries
Okay, let’s gather our simple but mighty ingredients for canning French fries. You’ll need:
- 4 lbs russet potatoes (the starchier the better – I’ll explain why below)
- 1 tablespoon lemon juice or vinegar per quart of water (for that crucial soaking step)
- Fresh, clean water (enough to cover your potato strips)
- Salt (optional, for flavor – I usually add 1 tsp per quart)
The potatoes should be peeled and cut into those perfect fry-sized strips we all crave – about 1/4 to 1/2 inch thick. And don’t skimp on the water bath with lemon juice or vinegar – it’s what keeps your fries from turning that unappetizing gray color while they wait their turn in the canner.
Ingredient Notes & Substitutions
Now, why russet potatoes? Their high starch content gives us that fluffy interior we love in good fries. Yukon Golds can work in a pinch, but avoid waxy varieties – they tend to get mushy. No lemon juice? White vinegar works just as well for the soak. Some folks ask about citric acid powder – yes, you can use 1/4 teaspoon per quart instead. The salt is totally optional, but I find it helps the flavor when you’re ready to fry them up later. One golden rule – always start with fresh, firm potatoes without any sprouts or green spots!
Equipment Needed for Canning French Fries
Alright, let’s talk tools! You’ll need a few key items to make this canning French fries magic happen:
- Pressure canner (non-negotiable – potatoes are low-acid and need that high heat to stay safe)
- Canning jars with lids (I prefer wide-mouth quarts for easy packing)
- Sharp knife (for cutting those perfect fry strips)
- Large bowls (one for soaking, one for ice water)
- Slotted spoon (for fishing out blanched fries)
- Jar lifter (trust me, you don’t want to handle hot jars bare-handed)
That pressure canner might seem intimidating if you’re new to canning, but it’s the only way to safely preserve potatoes. Regular water bath canning just doesn’t get hot enough to kill all the nasty bacteria that could grow in low-acid foods like potatoes.
Step-by-Step Guide to Canning French Fries
Okay, let’s roll up our sleeves and make some canned French fries that’ll have your future self doing a happy dance! I’ll walk you through each step carefully – this isn’t complicated, but there are a few key moments where timing really matters. Grab your potatoes and let’s get started!
Preparing the Potatoes
First things first – give those russets a good scrub under cold water. I like to peel mine (though you can leave some skin on if you’re feeling rustic). Now the fun part – cutting them into perfect fry shapes! Aim for uniform 1/4 to 1/2 inch strips – this ensures even cooking. Immediately toss them into that lemon water bath as you go – 30 minutes of soaking prevents discoloration and removes excess starch. You’ll see the water get cloudy – that’s exactly what we want!
Blanching and Packing
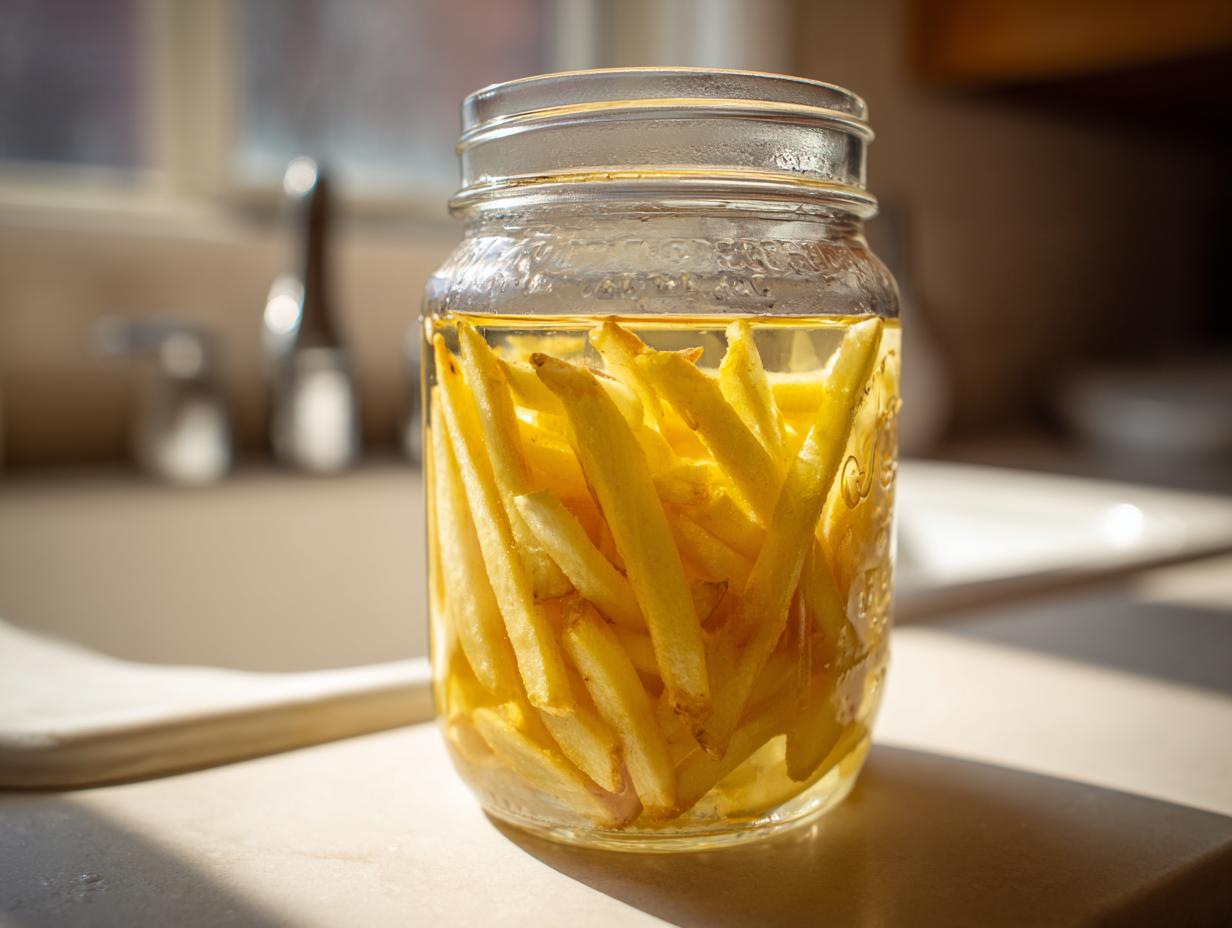
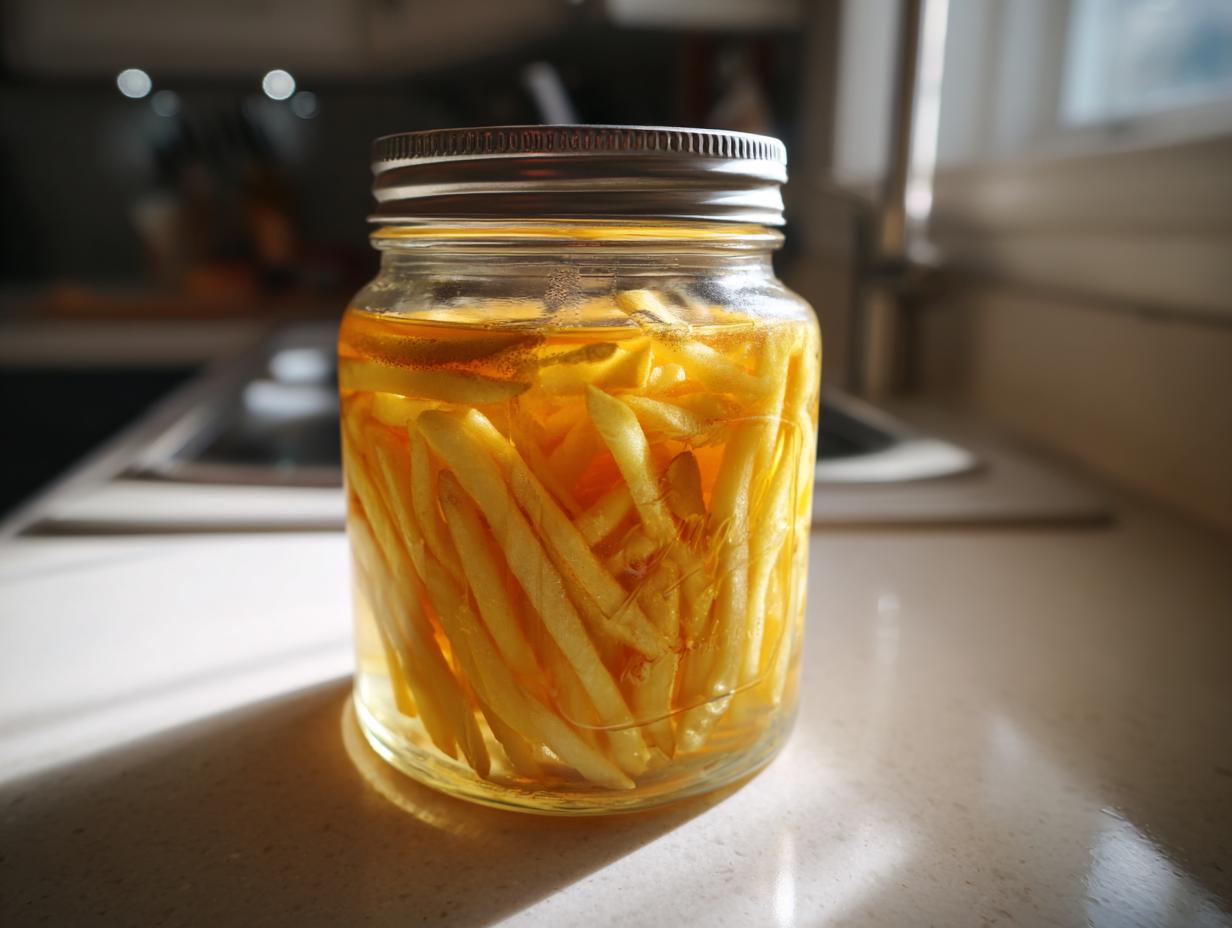
Here’s where the magic starts! Bring a big pot of water to boil and cook your fries for just 3-5 minutes – they should bend slightly but not break. Quickly transfer them to an ice bath to stop the cooking. Now pack those blanched fries tightly into sterilized jars – I use a clean wooden spoon to gently press them in without crushing. Leave 1 inch of headspace, then cover with fresh boiling water (same 1 inch space). Wipe those rims spotless – any food residue can ruin your seal!
Pressure Canning Process
Time for the main event! Process pints at 10 lbs pressure for 35 minutes, quarts for 45 minutes. Remember – altitude matters! Add 1 lb pressure for every 2,000 feet above sea level. After processing, turn off the heat and let the canner depressurize naturally – no peeking! When it’s safe, remove jars with your lifter and let them cool undisturbed for 24 hours. That satisfying “ping” means your canned French fries are shelf-ready! Always check seals – lids should be concave and not move when pressed.
Tips for Perfect Canned French Fries
After years of canning French fries (and yes, a few learning experiences along the way), I’ve gathered some foolproof tips to guarantee perfect results every time. First – and I can’t stress this enough – always use the freshest potatoes you can find. Those sprouting in your pantry for weeks? Not ideal. Cut your fries as uniformly as possible – I keep a ruler in my kitchen drawer just for this!
That 1-inch headspace isn’t just a suggestion – too little and you risk siphoning, too much and your fries might discolor. Store your jars in a cool, dark place (my basement shelf works great), and always, always use a pressure canner – no shortcuts with water bath canning here. One last pro tip? Label your jars with the date – you’ll thank yourself when you’re reaching for that perfectly preserved batch months later!
Serving Suggestions for Canned French Fries
Oh, the possibilities with these canned fries! My absolute favorite way is to drain them well and give them a quick fry in hot oil – just 2-3 minutes until golden and crispy. No oil? No problem! Toss them on a baking sheet at 425°F for about 15 minutes, flipping halfway. Sprinkle with sea salt right after cooking – the heat helps it stick.
For extra fun, try tossing them with garlic powder, smoked paprika, or grated Parmesan. They’re perfect alongside burgers, or serve them loaded with cheese, bacon bits, and green onions for game day. My kids love them with homemade ranch or spicy ketchup for dipping!
Storing and Shelf Life
Here’s the scoop on keeping your canned French fries at their best! Store those jars in a cool, dark place – my pantry’s bottom shelf works perfectly. They’ll stay good for up to a year, but trust me, you’ll use them way before then! Always check for signs of spoilage before opening – bulging lids, cloudy liquid, or off smells mean it’s time to toss. And those jars? Wash them well and reuse for your next canning adventure (just always use new lids for proper sealing). Happy storing!
Nutritional Information
Just a quick note about nutrition – these canned French fries are basically preserved potatoes at their core! The exact numbers will vary depending on your potato size, whether you leave skins on, and how you prepare them later. Some folks add salt, others keep it plain – it’s all about personal preference. What I can say? They’re a fantastic way to preserve potatoes’ natural goodness for when the fry craving strikes!
FAQ About Canning French Fries
I get so many great questions about canning French fries – let me answer the ones that pop up most often!
Can I skip the blanching step? Oh honey, don’t even think about it! Blanching stops enzyme action that causes discoloration and helps set that perfect texture. I tried skipping it once (big mistake) and ended up with gray, mushy fries. That quick 3-5 minute boil makes all the difference!
Why can’t I use a water bath canner? Potatoes are low-acid foods, which means nasty bacteria like botulism could grow if not processed at high enough temps. Your regular boiling water bath only reaches 212°F – a pressure canner hits 240°F, which is the safety sweet spot for potatoes. Better safe than sorry!
How do I get them crispy after canning? My foolproof method? Drain them well, pat dry with paper towels, then fry in 375°F oil for 2-3 minutes. If you’re baking, spread them in a single layer on a parchment-lined sheet at 425°F – the drier they are before cooking, the crispier they’ll get. A light coating of oil helps too!
Can I add seasonings before canning? I’d wait until you’re ready to cook them. Some spices can get bitter during processing, and salt amounts can affect the preservation. Fresh garlic or onions are a no-go for canning safety – but oh boy, you can go wild with seasonings when you fry them up!
How long do they take to cook from the jar? That’s the beauty – they’re already partially cooked! Just drain, and they’ll be ready in minutes. Frying takes 2-3 minutes, baking about 15. They heat up even faster than frozen fries because they’re preserved at peak freshness!
Share Your Experience
I’d love to hear how your canning French fries adventure turns out! Did you try any fun seasoning twists? Any “aha” moments while processing? Drop a comment below with your results – there’s nothing like sharing kitchen wins with fellow fry lovers. Happy canning, friends!
PrintCanning French Fries: 4 Easy Steps for Crispy Perfection
Learn how to can French fries for long-term storage. This method preserves the texture and flavor, allowing you to enjoy crispy fries anytime.
- Prep Time: 1 hour
- Cook Time: 45 minutes
- Total Time: 1 hour 45 minutes
- Yield: 4 quarts 1x
- Category: Preserving
- Method: Pressure Canning
- Cuisine: American
- Diet: Vegetarian
Ingredients
- 4 lbs potatoes (russet or similar starchy type)
- 1 tbsp lemon juice or vinegar (per quart of water)
- Water (enough to cover potatoes)
- Salt (optional, to taste)
- Vegetable oil (for frying, if preparing before canning)
Instructions
- Wash and peel the potatoes, then cut them into uniform fry-sized strips.
- Soak the cut fries in cold water with lemon juice or vinegar for 30 minutes to prevent browning.
- Blanch the fries in boiling water for 3-5 minutes, then drain and cool in ice water.
- Pack the blanched fries tightly into sterilized canning jars, leaving 1-inch headspace.
- Cover the fries with boiling water, maintaining the 1-inch headspace.
- Wipe jar rims, apply lids, and process in a pressure canner at 10 lbs pressure for 35 minutes (pints) or 45 minutes (quarts).
- Let jars cool, check seals, and store in a cool, dark place.
Notes
- Use only fresh, firm potatoes without blemishes.
- For crispier results, fry the canned fries before serving.
- Process times may vary by altitude – adjust accordingly.
- Consume within 1 year for best quality.
Nutrition
- Serving Size: 1/2 cup
- Calories: 150
- Sugar: 1g
- Sodium: 10mg
- Fat: 0g
- Saturated Fat: 0g
- Unsaturated Fat: 0g
- Trans Fat: 0g
- Carbohydrates: 35g
- Fiber: 3g
- Protein: 4g
- Cholesterol: 0mg